Hey, Everybody!!! I hope you had a spectacular weekend. Mother Nature was VERY kind to us yesterday and gave us a nice long sip of spring. Mr. Inspiring and I spent the day
de-junking cleaning out the garage. We took some unwanted items to the curb, and a guy came along and salvaged almost everything. We talked to him for a while and realized that he was a handicapped person that was making it on his own. It felt good to know that we helped him out. He was very appreciative and kept thanking us. It was GOOD.
Today I crafted and created and worked on projects.
First off - I have all the paint applied to my door that I'm turning into my headboard. I'm so excited, and can't wait to start on the next step!!!
Then, while I was waiting for my coats of paint to dry, I played around with the cricut. A couple of Christmas's ago, I made all of our family members tiles with their last names on them. I cut out vinyl and then mod podged them. They turned our super duper cute!! And ever since, I've been wanting one. But, 11 letters was NOT going to look right on the 12" x 12" tiles like I made for everyone else. So after cruising blogland, I found Denise's wonderful tutorial for these tiles, using SCAL. You can find her tute on her wibsite,
http://paperpastime.com/ and the tutorial is called "Split a Letter With SCAL2 Video". It's dated February 23, 2011. Denise is AWESOME and has done some wonderful projects. I've been watching her for over a year. Well, I did mine today, and while I think it looks very cool, it's also hard to read in certain light........... Mr. Inspiring suggested making the name in a different color and leaving the big W in the gold sparkle........... He just may be on to something.....
Here's my tile:
Here's what the vinyl looked like before I applied it to the tile:
Total cost for this tile project? Just the cost of the tile, less that $5. The vinyl is part of the huge bag of bits and pieces our local graphics shop gave me!! Told you I got some great vinyl!!
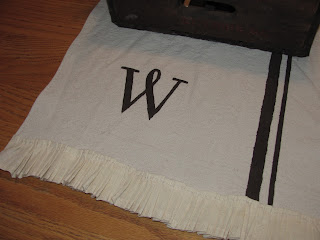
I posted pictures of my candles last Monday, and the soda box that I put them in and set them on my dining table. Well, just in one week, my table has gotten a bunch of new scratches. Not good. I'm not horribly upset, as I want to redo the table (it's that orangey golden oak stain), but I'm not really happy about it, either. So I made a table runner to put underneath the soda box.
I figured out what size I wanted it to be, then I cut my piece of drop cloth and inch wider and an inch longer than the finished size of 16" x 38". I used blue painters tape to make my stripes.
(I promise, they really aren't as crooked as this picture shows...)
Using a sponge 'brush' I painted and dabbed on my brown acrylic craft paint.
I cut a 'W' out with my cricut using SCAL2. It's my favorite font 'Fontleroy' - The same one I used for my 'W' on my lamps!! I cut it out in vinyl and kept the negative to make my stencil.
I didn't take anymore pictures for the next couple of steps. (My batteries kind of died...)
But I did both ends with the same W. I took some old (and I mean OLD) muslin, and cut 3" strips. I folded the sides over and stitched it, then kind of gathered/pleated it and stitched it to the runner. It is NOT the most beautifully sewn, technically correct project ever done. And it came out just like I wanted. NOT perfect. And that's perfect for me!!!
Total cost for this project? The 4' x 15' drop cloth was less than $20 and I've got a TON left for more projects!! I had the paint and the sponge brush and the tape. And again, the vinyl I used to make the W was part of the sack of bits and pieces. The OLD muslin - I'm tellin' ya -- It's old! I got it when my ex husbands grandma passed away in 1989. It was with a bunch of fabric she had tucked away for quilting, and looking at it, you don't see this kind of material in stores anymore. I knew it was OLD in '89!!
I'm just loving that drop cloth!!!
Have a great week!!!
Hugs ~~ Suz
I'm linking up to:


![[Wreath 005 - 1[4].jpg]](https://blogger.googleusercontent.com/img/b/R29vZ2xl/AVvXsEiMRNbVmQCKaDcNR3wmqn_J6zgq2o8mY1dkUZcyYIzNnUoAWz8dHKYTZraQHBeU6AOh1dreZsRoBsBAb8uOoVZN2F9M6JGfRq0BAJE7KczIvXkaPedXgd8NySpPZ3-83-p4JFhbAv0NZGh-/s1600/Wreath+005+-+1%5B4%5D.jpg)


